
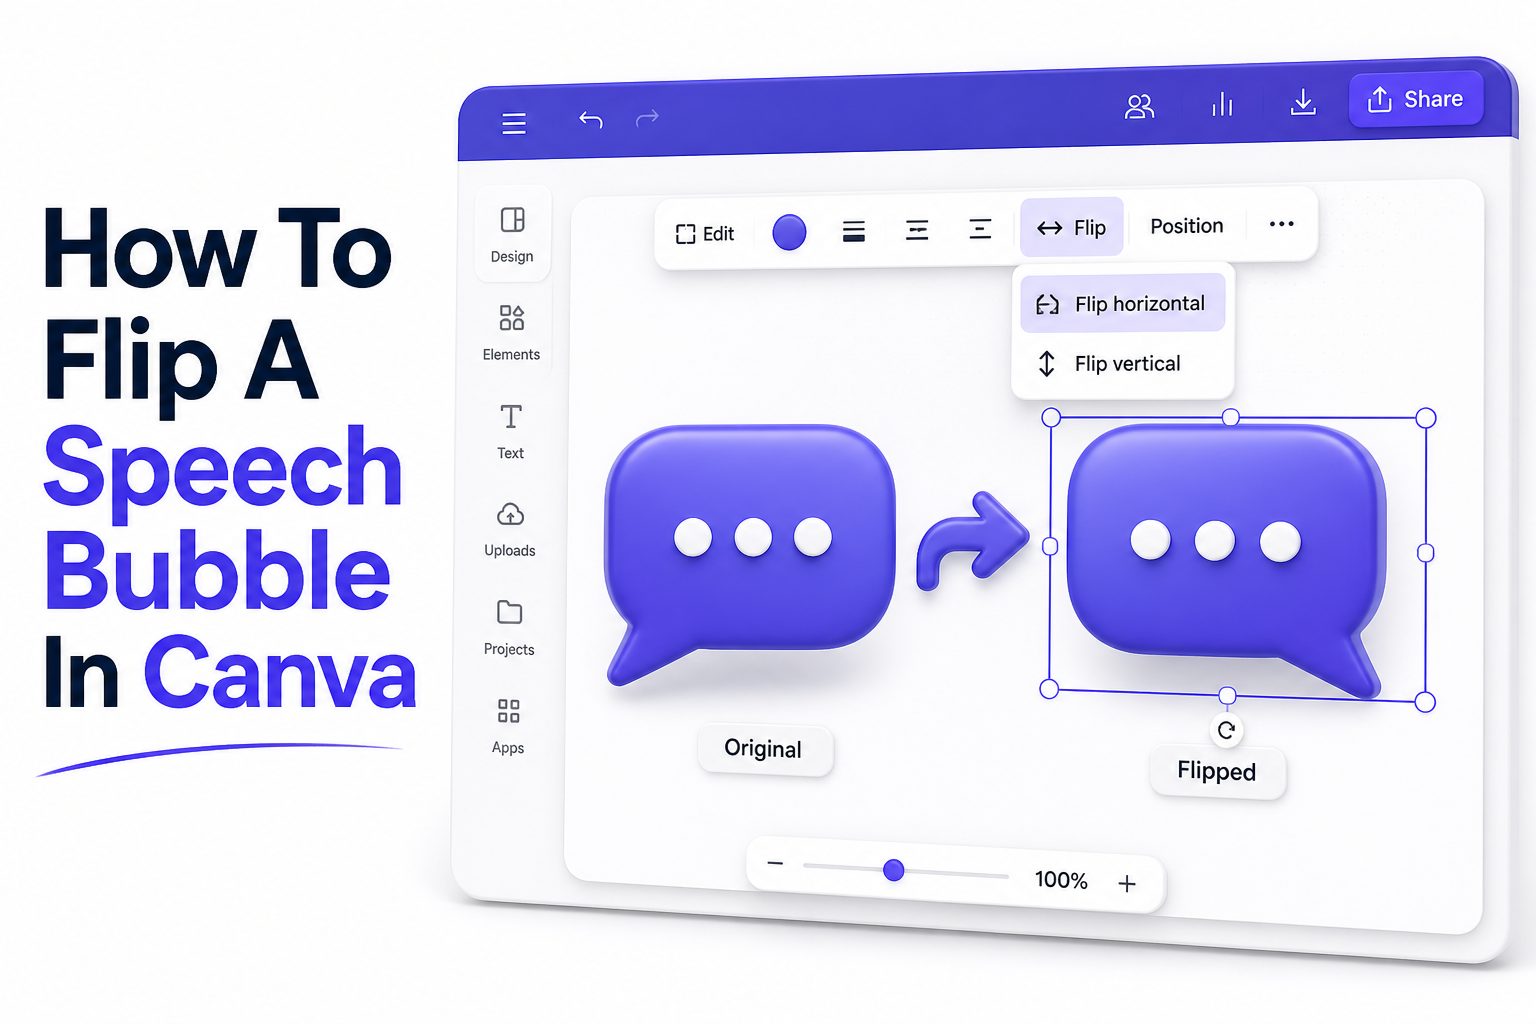
Canva makes it easy to build posters, social posts, comics, classroom worksheets, thumbnails, and branded graphics without needing advanced design software. Still, small layout details can make a design feel polished or awkward. One common detail is the direction of a speech bubble tail.
If you are learning how to flip a speech bubble in Canva, the good news is that the process is quick once you know where the flip controls are. Whether you want the bubble tail pointing toward a person, product, character, or icon, Canva gives you several ways to adjust it. This guide walks you through the steps, explains when flipping works best, and shows how to avoid common mistakes that can make your design look uneven or hard to read.
Why Flipping a Speech Bubble Matters in Canva
A speech bubble is more than a decorative shape. It tells the viewer who is speaking, thinking, reacting, or calling attention to something important. When the tail points in the wrong direction, the message can feel disconnected from the person or object it belongs to.
Flipping the bubble helps align the visual flow of your design. In social media graphics, comic-style layouts, worksheets, and ads, direction matters because the eye follows shape, text, and spacing. A properly flipped speech bubble keeps the message clear and easy to follow.
When to Flip Instead of Rotate a Speech Bubble
Flipping and rotating are not the same action in Canva. Flipping mirrors the speech bubble from left to right or top to bottom, while rotating turns the entire element around an angle. For most speech bubble edits, flipping gives a cleaner result.
Rotation is useful when you need a playful or angled layout, but it can make text placement harder. If your main goal is to move the bubble tail from one side to another, flipping is usually the better choice because it preserves the bubble’s shape and balance.
Quick Benefits of Flipping a Speech Bubble
- Points the bubble tail toward the correct speaker or object
- Keeps comic panels and visual stories easier to read
- Helps social media posts look intentional and balanced
- Reduces the need to search for a new bubble element
- Saves time when editing templates or repeated layouts
- Makes classroom, marketing, and presentation graphics clearer
How to Flip a Speech Bubble in Canva on Desktop
Start by opening your Canva design and clicking the speech bubble element you want to adjust. Once selected, a toolbar appears near the top of the editor. Look for the Flip option, which may appear directly or inside a small menu depending on your screen size.
Choose Flip horizontal if you want the tail to move from left to right or right to left. Choose Flip vertical if you want the bubble mirrored from top to bottom. Most users working with dialogue bubbles will use horizontal flipping more often than vertical flipping.
Step-by-Step Desktop Method
First, select the speech bubble by clicking its border or shape area. If the bubble is grouped with text, you may need to click once to select the group, then click again to select only the shape. Canva highlights the selected element with a bounding box.
Next, click Flip in the toolbar and choose the direction you need. After flipping, check whether the text still sits neatly inside the bubble. If the text was grouped separately, it may not move exactly as expected, so reposition it before finalizing.
How to Flip a Speech Bubble in the Canva Mobile App
On mobile, open your design in the Canva app and tap the speech bubble. The editing controls appear at the bottom of the screen. Swipe through the toolbar until you find the Flip option, then choose horizontal or vertical depending on the direction you need.
The mobile editor uses less screen space, so zooming in helps when making precise adjustments. After flipping, pinch to zoom and check the tail direction, text alignment, and spacing around nearby elements. Small mobile edits can look different once viewed at full size.
Desktop vs Mobile Flip Options
Feature | Canva Desktop | Canva Mobile App
Element selection | Easier with mouse precision | Works well with zooming
Flip control location | Top toolbar or menu | Bottom toolbar
Best for | Detailed layouts and templates | Quick edits and social posts
Text adjustment | Easier to fine-tune | May need zoom for accuracy
Recommended use | Multi-element designs | Simple bubble edits
How to Flip Grouped Speech Bubbles and Text
Many Canva speech bubble designs include separate text placed over a shape. If the text and bubble are grouped, flipping the group may mirror both elements together. This can sometimes make the text reverse or shift in a way that looks wrong.
A better method is to ungroup the bubble and text first. Flip only the bubble shape, then move the text back into position. Once everything looks correct, select both elements and group them again so they stay together while you continue designing.
How to Ungroup Before Flipping
Click the grouped speech bubble and look for the Ungroup option in the toolbar. If you are using the mobile app, tap the element and find Ungroup in the lower controls. Canva will separate the shape from the text, giving you more control.
After ungrouping, click only the speech bubble shape and apply the flip. Leave the text readable and unflipped. This approach is especially useful for worksheets, quote graphics, comic panels, and brand visuals where legibility matters more than speed.
Fixing Text After You Flip a Bubble
Text should always remain easy to read after the bubble changes direction. If the bubble tail moves closer to the text, adjust the text box width or move it slightly away from the tail. This gives the design more breathing room.
If your speech bubble has a narrow or irregular shape, resize the text box rather than shrinking the font too much. Smaller text may solve the spacing issue, but it can reduce readability on phones, thumbnails, and printed materials.
Flipping Checklist Before You Export
- The bubble tail points toward the correct speaker or subject
- The text is not mirrored, cramped, or touching the bubble edge
- The bubble still fits the layout after being flipped
- Nearby images, icons, and shapes have enough spacing
- The design looks clear on both desktop and mobile preview
- The bubble style matches the tone of the full design
Best Canva Speech Bubble Types for Flipping
Canva offers many bubble styles, including classic comic bubbles, rounded callouts, cloud shapes, thought bubbles, and sticker-style captions. Simple outline or filled bubbles usually flip cleanly because their shape remains balanced after mirroring.
More decorative bubbles may need extra care. Hand-drawn, shadowed, or layered speech bubbles can look slightly different after flipping. If the element has highlights, shadows, or texture, inspect it closely to make sure the mirrored version still feels natural.
Using Canva Elements Search Effectively
To find speech bubbles, open Elements and search for terms like speech bubble, chat bubble, comic bubble, talk bubble, quote bubble, or callout. Each search phrase returns slightly different styles, so try more than one if the first results feel limited.
If you often make visual posts, save your favorite bubbles in a folder or brand kit area when available. This keeps your designs consistent and reduces the time spent searching for a bubble that can be flipped and reused across multiple projects.
Common Mistakes When Flipping Speech Bubbles
One common mistake is flipping both the speech bubble and the text at the same time. This can make the text appear backward or poorly aligned. Always check whether the text is part of the same grouped element before using the flip control.
Another mistake is choosing vertical flip when horizontal flip is needed. Horizontal flip changes the tail from left to right, which is usually what designers want. Vertical flip is better for special cases, such as moving a callout from above to below.
How to Avoid Distorted Bubble Layouts
Avoid stretching the speech bubble too far after flipping. Dragging only one side can distort rounded corners, tails, and outlines. Instead, use corner handles when resizing so the original proportions stay intact and the bubble remains visually clean.
Also watch the relationship between the bubble and the subject. A tail that barely points toward a person can still feel misplaced. Move the bubble closer, adjust its size, or choose a different bubble style if the connection is not obvious.
Mistakes and Better Fixes
Mistake | Better Fix
Flipping grouped text | Ungroup first, then flip only the bubble
Using rotate instead of flip | Use Flip horizontal for side changes
Stretching the bubble unevenly | Resize from the corners
Leaving text too close to the tail | Move or narrow the text box
Choosing a busy bubble style | Use a simpler callout for clarity
Design Tips for Better Speech Bubble Placement
Place speech bubbles where they support the natural reading direction of the design. In English layouts, viewers usually scan from left to right and top to bottom. A bubble placed near the speaker and aligned with that flow feels easier to process.
Keep enough space between the bubble and the edge of the design. If the bubble sits too close to the margin, it may feel cramped or get cropped on social platforms. Canva’s position tools and alignment guides can help keep spacing consistent.
Matching Bubble Style to the Design
A comic bubble works well for playful content, memes, classroom materials, and character-based posts. A clean rounded callout is better for business graphics, tutorials, product highlights, and presentations. The right style makes the message feel intentional instead of pasted on.
Use color carefully. A bright bubble can draw attention, but it should still match the design palette. If your design already has strong colors, a white or lightly tinted bubble with dark text often gives the clearest result.
How to Flip a Canva Speech Bubble for Social Media Posts
Social media designs need to be readable at small sizes. After flipping a speech bubble, zoom out and view the design as a viewer would see it in a feed. If the text becomes hard to read, simplify the wording or enlarge the bubble.
For Instagram, Facebook, Pinterest, and LinkedIn graphics, the bubble should support the main message rather than compete with it. Use it for a short quote, reaction, label, or callout. Long paragraphs inside speech bubbles usually look crowded on mobile screens.
Examples for Social Media Layouts
If you are designing a testimonial post, place the customer photo on one side and flip the bubble tail toward the person. This creates a natural connection between the quote and the image, which helps viewers understand the context faster.
For a product feature post, point the bubble tail toward the item being highlighted. The bubble can contain a short phrase such as “New size,” “Limited offer,” or “Best for beginners.” For more visual planning ideas, see [Internal Link: Canva Social Media Design Tips].
Social Media Speech Bubble Tips
- Use short text that stays readable on mobile
- Point the tail toward the photo, product, or icon being referenced
- Leave space around the bubble for platform cropping
- Use high contrast between the bubble and background
- Keep the bubble style consistent across carousel slides
- Preview the design at smaller sizes before exporting
Using Speech Bubbles in Presentations and Worksheets
Speech bubbles are useful in presentations because they can make a point feel more conversational. A flipped bubble can guide attention toward a chart, image, or character without needing a large arrow. This works well for training slides and educational decks.
In worksheets, speech bubbles help provide instructions, hints, examples, or prompts. When the tail points toward the relevant illustration or exercise, students can connect the note to the task more quickly. Clear direction reduces confusion, especially in busy worksheet layouts.
Keeping Educational Designs Clear
For classroom materials, avoid using too many speech bubbles on one page. Each bubble should have a specific purpose. If every element has a callout, the design becomes harder to scan and students may miss the most important instruction.
Choose simple fonts and strong contrast for educational use. A flipped bubble may solve direction, but readability still depends on text size, spacing, and color. If learners will print the worksheet, test the design in black and white before sharing.
How to Flip a Speech Bubble Without Flipping Text
The safest method is to separate the text from the bubble before flipping. Select the grouped element, click Ungroup, then click only the speech bubble shape. Apply Flip horizontal or Flip vertical to the shape, leaving the text box unchanged.
After flipping the shape, drag the text back into the center of the bubble. Use Canva’s alignment guides to center it neatly. When you are satisfied, select both the text and the bubble, then group them again for easier movement.
When Text Is Part of an Image
Some Canva elements are actually single graphic files, meaning the bubble and text cannot be edited separately. If text is built into the image, flipping the element will mirror the text too. In that case, choose a blank bubble instead.
You can recreate the look by placing your own text over a blank speech bubble. This gives you full control over font, size, color, and alignment. It also makes future edits much easier, especially if you reuse the same template.
Troubleshooting Canva Flip Problems
If the Flip button does not appear, make sure you selected an element that Canva can transform. Some locked elements, background images, or template layers may need to be unlocked first. Click the lock icon if the design owner has allowed editing.
If the bubble flips but moves unexpectedly, check whether it is grouped, layered, or attached to other elements. Canva may transform the selected group as one object. Ungrouping and selecting the bubble alone usually fixes most unexpected movement issues.
Fixing Layer and Selection Issues
Use the Position panel when elements overlap. It lets you move items forward or backward and makes it easier to select the bubble without accidentally choosing the text, image, or background. This is especially helpful in dense templates.
You can also temporarily move nearby elements aside while editing the bubble. After flipping and aligning the shape, move the other elements back into place. This simple workflow prevents accidental edits and keeps the final design cleaner.
Troubleshooting Quick List
- If Flip is missing, check whether the element is locked
- If text reverses, ungroup and flip only the bubble
- If the wrong item flips, use Position to select layers correctly
- If the bubble looks stretched, resize from the corners
- If the tail points poorly, move the bubble closer to the subject
- If editing is limited, replace the element with a blank bubble
Using Canva Keyboard and Alignment Tools
Canva does not rely on a single keyboard shortcut for flipping speech bubbles in every context, so the toolbar is usually the most reliable method. Still, keyboard shortcuts can help you duplicate, move, group, and align elements faster while editing.
Use arrow keys for small position changes after flipping. Hold Shift while dragging corners to keep proportions steady when needed. Canva’s pink alignment guides can help center the bubble, align it with other objects, and maintain consistent spacing across the design.
Grouping for Faster Reuse
Once your flipped bubble and text look right, group them together. This keeps the elements connected if you move or resize the design. Grouping is especially helpful when building carousels, worksheets, comic panels, or templates with repeated dialogue elements.
You can duplicate the finished group and edit the text for new sections. If the duplicated bubble needs to point the other way, ungroup it, flip the shape, adjust the text, and group it again. For related design workflow help, visit [Internal Link: Canva Template Editing Guide].
How to Use Flipped Speech Bubbles in Brand Designs
Brand designs should feel consistent, even when they use playful elements. If you use speech bubbles in marketing graphics, define a small set of bubble styles, colors, and fonts. This keeps your designs recognizable across social posts, ads, and presentations.
Flipping the same bubble style is often better than mixing several different bubbles. A consistent shape can point left, right, up, or down while still feeling part of the same visual system. This matters for brands that publish content frequently.
Maintaining Visual Consistency
Keep your bubble border, fill color, font, and shadow treatment consistent. If one bubble has a thick outline and another has no outline, the design can feel patched together. Consistency makes even simple Canva designs look more professional.
Use brand colors sparingly inside speech bubbles. If the background already uses brand colors, a neutral bubble may be cleaner. If the background is plain, a branded bubble can add energy while still keeping the message readable.
Brand Design Checklist
- Use one or two speech bubble styles across branded assets
- Keep font choices consistent with your brand kit
- Match bubble colors to your approved palette
- Flip the same bubble style instead of replacing it repeatedly
- Check contrast for accessibility and readability
- Save finished bubble groups for future templates
Advanced Layout Ideas for Speech Bubbles
Speech bubbles can guide attention through a layout when used thoughtfully. In a tutorial graphic, one bubble might introduce the step, while another points to the exact button or feature. Flipping each bubble helps create a clear visual path.
In comic-style content, alternating bubble direction can make dialogue feel natural. A left-facing bubble can belong to one character, while a right-facing bubble belongs to another. This creates rhythm without needing heavy design effects or complicated illustrations.
Layering Bubbles With Images
When placing a speech bubble over a photo, choose a location with enough empty space. Busy backgrounds reduce readability, especially if the bubble has a transparent fill. A solid fill or subtle outline usually works better over detailed images.
Make sure the bubble tail does not cover faces, product details, or important text. If it does, flip the bubble, move it to another corner, or choose a smaller callout. The goal is to support the main image, not hide it.
Exporting Your Canva Design After Flipping
Before downloading, inspect the final design at full size and at a smaller preview size. Speech bubbles often look fine while zoomed in but feel too large or too small when viewed as a whole. This final check catches spacing and readability issues.
Choose the export format based on where the design will be used. PNG is a strong choice for social graphics, while PDF works well for worksheets and presentations. If your design includes animation, use Canva’s video or GIF export options.
Final Quality Checks
Look for alignment, spacing, and consistency before exporting. Make sure every bubble tail points to the correct subject and that no text touches the edge of a bubble. These small details help the final design feel clean and intentional.
If you are creating a reusable template, keep an editable Canva version. That way, you can quickly flip bubbles, replace text, or change colors for future designs without starting from scratch. Reusable layouts save time and help maintain consistency.
Conclusion
Flipping a speech bubble in Canva is a small edit, but it can make a major difference in how clearly your design communicates. The right bubble direction connects text to the correct person, product, character, or visual detail, which makes the layout easier to read.
The best approach is simple: select the bubble, use the Flip tool, then check the text, spacing, and alignment before exporting. If the bubble and text are grouped, ungroup them first so the words stay readable. With a little care, you can use speech bubbles in social posts, presentations, worksheets, ads, and templates without creating visual confusion. Once you know how to flip a speech bubble in Canva, you can adjust layouts faster and make your designs feel more polished.
FAQ
Can I flip only the speech bubble tail in Canva?
You can flip the whole speech bubble shape, which moves the tail to the opposite side. If you need only the tail changed, choose a different bubble element or use a blank callout shape with editable parts.
Why does my text flip backward in Canva?
Your text likely flipped because it was grouped with the speech bubble or included inside a single graphic element. Ungroup editable text first, flip only the bubble shape, then reposition the text inside the bubble.
Where is the Flip button in Canva?
On desktop, the Flip button appears in the top toolbar after selecting an element. On mobile, tap the element and swipe through the bottom toolbar until you find the Flip option.
Can I flip Canva speech bubbles vertically?
Yes, Canva lets you flip many speech bubbles vertically. This mirrors the shape from top to bottom, which can help when moving a callout tail above or below an object.
What should I do if a speech bubble will not flip?
Check whether the element is locked, grouped, or part of a fixed template layer. Unlock it if possible, ungroup connected items, or replace it with another editable speech bubble from Canva Elements.
0 Comments